can you upload python files to github
Sentry Now This tutorial has a related video course created by the Existent Python team. Spotter it together with the written tutorial to deepen your understanding: Introduction to Git and GitHub for Python Developers
Have you always worked on a Python project that stopped working after y'all made a change hither or a PEP-8 cleanup there, and yous weren't quite sure how to get it back? Version control systems can help you solve that problem and other related ones. Git is one of the most popular version control systems today.
In this tutorial, I'll walk yous through what Git is, how to utilize it for your personal projects, and how to utilise information technology in conjunction with GitHub to work with other people on larger projects. We'll expect at how to create a repo, how to add both new and modified files, and how to navigate through your project's history so y'all can "get back" to when your project was working.
This article assumes yous already have Git installed on your organization. If you don't, the fantabulous Pro Git volume has a section on how to do that.
What Is Git?
Git is a distributed version control system (DVCS). Let'southward break that down a bit and await at what it means.
Version Command
A version control system (VCS) is a set up of tools that track the history of a set up of files. This means that you can tell your VCS (Git, in our case) to relieve the state of your files at any signal. And then, you may proceed to edit the files and shop that state likewise. Saving the land is like to creating a fill-in copy of your working directory. When using Git, we refer to this saving of state as making a commit.
When you make a commit in Git, you add a commit message that explains at a high level what changes yous made in this commit. Git can show you the history of all of the commits and their commit messages. This provides a useful history of what piece of work y'all have done and can really help pinpoint when a bug crept into the system.
In addition to showing yous the log of changes you've made, Git also allows you to compare files between different commits. As I mentioned earlier, Git will also permit you lot to return any file (or all files) to an earlier commit with footling effort.
Distributed Version Control
OK, so that's a version command system. What'southward the distributed part? It's probably easiest to answer that question by starting with a little history. Early on version control systems worked by storing all of those commits locally on your hard bulldoze. This collection of commits is called a repository. This solved the "I need to go back to where I was" problem only didn't calibration well for a team working on the same codebase.
As larger groups started working (and networking became more than common), VCSs inverse to store the repository on a central server that was shared by many developers. While this solved many problems, information technology as well created new ones, like file locking.
Following the lead of a few other products, Git broke with that model. Git does non take a central server that has the definitive version of the repository. All users accept a full re-create of the repository. This means that getting all of the developers back on the same page tin sometimes be tricky, but it as well means that developers tin work offline most of the time, only connecting to other repositories when they demand to share their work.
That terminal paragraph can seem a piffling confusing at outset, because there are a lot of developers who apply GitHub as a cardinal repository from which everyone must pull. This is truthful, simply Git doesn't impose this. Information technology's just user-friendly in some circumstances to accept a central identify to share the code. The total repository is still stored on all local repos fifty-fifty when you use GitHub.
Basic Usage
Now that nosotros've talked nearly what Git is in general, let's run through an example and see it in activeness. We'll start past working with Git just on our local machine. In one case we get the hang of that, nosotros'll add GitHub and explicate how you lot tin can interact with it.
Creating a New Repo
To work with Git, you first need to tell it who you are. You can set your username with the git config command:
$ git config --global user.name "your name goes here" One time that is ste up, y'all will need a repo to work in. Creating a repo is simple. Use the git init command in a directory:
$ mkdir instance $ cd example $ git init Initialized empty Git repository in /abode/jima/tmp/example/.git/ Once you have a repo, you can ask Git about it. The Git command you'll utilise well-nigh frequently is git status. Endeavour that at present:
$ git status On branch primary Initial commit nothing to commit (create/copy files and utilize "git add" to rails) This shows you a couple of bits of data: which branch you're on, principal (we'll talk about branches later), and that y'all have nothing to commit. This last office ways that at that place are no files in this directory that Git doesn't know about. That's good, as we simply created the directory.
Adding a New File
Now create a file that Git doesn't know most. With your favorite editor, create the file hello.py, which has but a print argument in it.
# howdy.py print ( 'hi Git!' ) If y'all run git status again, yous'll see a different outcome:
$ git status On branch master Initial commit Untracked files: (use "git add together <file>..." to include in what will be committed) hello.py nothing added to commit but untracked files nowadays (utilise "git add" to track) Now Git sees the new file and tells you that information technology'due south untracked. That'southward just Git's mode of saying that the file is not part of the repo and is not nether version command. We tin can fix that by adding the file to Git. Use the git add command to make that happen:
$ git add together hello.py $ git status On branch main Initial commit Changes to be committed: (use "git rm --cached <file>..." to unstage) new file: hello.py Now Git knows about hello.py and lists it under changes to be committed. Calculation the file to Git moves it into the staging area (discussed below) and means we can commit information technology to the repo.
Committing Changes
When you commit changes, you are telling Git to make a snapshot of this state in the repo. Do that now by using the git commit command. The -m pick tells Git to use the commit message that follows. If y'all don't use -m, Git will bring upward an editor for y'all to create the commit message. In full general, you desire your commit messages to reflect what has inverse in the commit:
$ git commit -g "creating hello.py" [master (root-commit) 25b09b9] creating hello.py 1 file changed, 3 insertions(+) create style 100755 hullo.py $ git status On branch master zip to commit, working directory make clean You lot tin can see that the commit command returned a bunch of data, most of which isn't that useful, just it does tell you that only 1 file inverse (which makes sense as we added one file). Information technology also tells you the SHA of the commit (25b09b9). We'll have an aside almost SHA a fleck later.
Running the git condition command once more shows that we have a make clean working directory, meaning that all changes are committed to Git.
At this betoken, we demand to stop our tutorial and have a quick conversation about the staging area.
Aside: The Staging Expanse
Unlike many version control systems, Git has a staging surface area (often referred to as the alphabetize). The staging area is how Git keeps rail of the changes you desire to be in your next commit. When nosotros ran git add together above, nosotros told Git that we wanted to movement the new file hello.py to the staging area. This change was reflected in git status. The file went from the untracked department to the to be committed department of the output.
Note that the staging area reflects the exact contents of the file when y'all ran git add together. If y'all modify information technology again, the file volition announced both in the staged and unstaged portions of the status output.
At any point of working with a file in Git (assuming information technology'due south already been committed once), there can be 3 versions of the file you can work with:
- the version on your hard bulldoze that yous are editing
- a dissimilar version that Git has stored in your staging area
- the latest version checked in to the repo
All 3 of these can be different versions of the file. Moving changes to the staging surface area and so committing them brings all of these versions back into sync.
When I started with Git, I found the staging area a little confusing and a bit annoying. Information technology seemed to add extra steps to the procedure without adding whatever benefits. When you're showtime learning Git, that's actually true. Later on a while, there will be situations where you come to really appreciate having that functionality. Unfortunately, those situations are beyond the telescopic of this tutorial.
If you're interested in more than detailed info about the staging surface area, I can recommend this blog post.
.gitignore
The status command is very handy, and you'll find yourself using information technology often. Simply sometimes you'll find that there are a bunch of files that show up in the untracked section and that y'all desire Git to merely not see. That's where the .gitignore file comes in.
Let'south walk through an example. Create a new Python file in the same directory called myname.py.
# myname.py def get_name (): return "Jim" And then modify your hello.py to include myname and telephone call its function:
# hullo.py import myname proper name = myname . get_name () print ( "hello {} " . format ( proper noun )) When you import a local module, Python will compile information technology to bytecode for y'all and get out that file on your filesystem. In Python 2, it will go out a file chosen myname.pyc, but nosotros'll assume you're running Python 3. In that example it will create a __pycache__ directory and shop a pyc file there. That is what'southward shown beneath:
$ ls how-do-you-do.py myname.py $ ./how-do-you-do.py hullo Jim! $ ls hello.py myname.py __pycache__ At present if y'all run git status, you'll come across that directory in the untracked section. Also note that your new myname.py file is untracked, while the changes you fabricated to hullo.py are in a new department called "Changes not staged for commit". This just means that those changes accept not all the same been added to the staging area. Let'due south endeavor it out:
$ git status On branch master Changes non staged for commit: (apply "git add together <file>..." to update what volition be committed) (use "git checkout -- <file>..." to discard changes in working directory) modified: hello.py Untracked files: (use "git add <file>..." to include in what will be committed) __pycache__/ myname.py no changes added to commit (utilise "git add" and/or "git commit -a") Before we movement on to the gitignore file, allow's clean up the mess we've made a picayune bit. Start we'll add together the myname.py and hello.py files, just like we did earlier:
$ git add myname.py hullo.py $ git condition On branch master Changes to be committed: (use "git reset Head <file>..." to unstage) modified: hullo.py new file: myname.py Untracked files: (use "git add <file>..." to include in what will be committed) __pycache__/ Permit's commit those changes and finish our make clean up:
$ git commit -m "added myname module" [principal 946b99b] added myname module 2 files changed, 8 insertions(+), 1 deletion(-) create mode 100644 myname.py Now when we run status, all we see is that __pycache__ directory:
$ git condition On branch master Untracked files: (apply "git add <file>..." to include in what will exist committed) __pycache__/ nothing added to commit but untracked files nowadays (use "git add" to rail) To get all __pycache__ directories (and their contents) to be ignored, we're going to add a .gitignore file to our repo. This is as simple as it sounds. Edit the file (call back the dot in front end of the proper name!) in your favorite editor.
Now when we run git condition, we no longer see the __pycache__ directory. Nosotros do, however, see the new .gitignore! Take a look:
$ git condition On branch primary Untracked files: (utilize "git add together <file>..." to include in what volition exist committed) .gitignore nothing added to commit only untracked files present (utilize "git add" to track) That file is just a regular text file and can be added to you repo similar whatever other file. Practice that now:
$ git add .gitignore $ git commit -m "created .gitignore" [main 1cada8f] created .gitignore 1 file changed, one insertion(+) create way 100644 .gitignore Some other common entry in the .gitignore file is the directory you store your virtual environments in. You can larn more virtually virtualenvs here, only the virtualenv directory is usually called env or venv. You can add these to your .gitignore file. If the files or directories are present, they volition be ignored. If they are non, then nothing volition happen.
Information technology'south as well possible to have a global .gitignore file stored in your home directory. This is very handy if your editor likes to go out temporary or backup files in the local directory.
Here's an example of a simple Python .gitignore file:
# .gitignore __pycache__ venv env .pytest_cache .coverage For a more consummate example, wait here or, if you want to build your own, git assist gitignore provides all the details you'll need.
What Non to Add to a Git Repo
When you showtime start working with any version control tool, especially Git, you might be tempted to put everything into the repo. This is mostly a mistake. At that place are limitations to Git equally well as security concerns that force y'all to limit which types of data you add together to the repo.
Let's start with the bones rule of thumb nigh all version command systems.
Only put source files into version command, never generated files.
In this context, a source file is any file you create, usually by typing in an editor. A generated file is something that the computer creates, unremarkably past processing a source file. For example, hello.py is a source file, while hi.pyc would exist a generated file.
In that location are 2 reasons for not including generated files in the repo. The beginning is that doing so is a waste material of time and space. The generated files tin can be recreated at any fourth dimension and may need to be created in a different form. If someone is using Jython or IronPython while you lot're using the Cython interpreter, the .pyc files might be quite different. Committing one particular flavour of files can cause conflict
The 2nd reason for not storing generated files is that these files are oft larger than the original source files. Putting them in the repo means that everyone at present needs to download and store those generated files, even if they're not using them.
This second point leads to another general rule nigh Git repos: commit binary files with caution and strongly avert committing large files. This rule has a lot to do with how Git works.
Git does not store a total copy of each version of each file you commit. Rather, it uses a complicated algorithm based on the differences between subsequent versions of a file to greatly reduce the amount of storage it needs. Binary files (like JPGs or MP3 files) don't actually have skilful diff tools, so Git will frequently just need to store the entire file each time it is committed.
When yous are working with Git, and especially when you are working with GitHub, never put confidential information into a repo, especially one you might share publicly. This is so important that I'k going to say it again:
Aside: What is a SHA
When Git stores things (files, directories, commits, etc) in your repo, it stores them in a complicated fashion involving a hash role. We don't need to go into the details here, but a hash office takes a matter and produces a unique ID for that thing that is much shorter (20 bytes, in our case). This ID is called a "SHA" in Git. Information technology is non guaranteed to be unique, but for almost practical applications it is.
Git uses its hash algorithm to index everything in your repo. Each file has a SHA that reflects the contents of that file. Each directory, in plow, is hashed. If a file in that directory changes, then the SHA of the directory changes besides.
Each commit contains the SHA of the pinnacle-level directory in your repo along with some other info. That's how a single 20 byte number describes the entire state of your repo.
You might observe that sometimes Git uses the full 20 grapheme value to evidence you a SHA:
commit 25b09b9ccfe9110aed2d09444f1b50fa2b4c979c Sometimes it shows you a shorter version:
[master (root-commit) 25b09b9] creating how-do-you-do.py Unremarkably, it volition show yous the full string of characters, merely you lot don't always have to use information technology. The rule for Git is that you merely have to give enough characters to ensure that the SHA is unique in your repo. Generally, seven characters is more enough.
Each time y'all commit changes to the repo, Git creates a new SHA that describes that state. We'll wait at how SHAs are useful in the next sections.
Git Log
Another very often used Git command is git log. Git log shows yous the history of the commits that yous have made upward to this point:
$ git log commit 1cada8f59b43254f621d1984a9ffa0f4b1107a3b Author: Jim Anderson <jima@example.com> Engagement: Sat Mar 3 13:23:07 2022 -0700 created .gitignore commit 946b99bfe1641102d39f95616ceaab5c3dc960f9 Author: Jim Anderson <jima@example.com> Engagement: Sat Mar 3 xiii:22:27 2022 -0700 added myname module commit 25b09b9ccfe9110aed2d09444f1b50fa2b4c979c Author: Jim Anderson <jima@example.com> Date: Sabbatum Mar 3 13:x:12 2022 -0700 creating hello.py As you tin see in the list above, all of the commit messages are shown for our repo in order. The get-go of each commit is marked with the give-and-take "commit" followed by the SHA of that commit. git log gives you the history of each of the SHAs.
Going Back In Fourth dimension: Checking Out a Detail Version of Your Code
Because Git remembers each commit yous've fabricated with it'due south SHA, y'all tin tell Git to get to any of those commits and view the repo every bit information technology existed and so. The diagram below shows what Git thinks is in our repo:
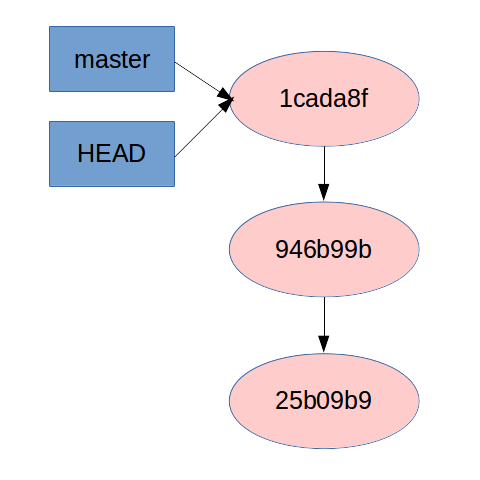
Don't worry about what master and Caput mean in the diagram. We'll explicate those in just a bit.
To change where we are in our history, we will employ the git checkout command to tell Git which SHA we want to await at. Let's try that:
$ git checkout 946b99bfe1641102d39f95616ceaab5c3dc960f9 Note: checking out '946b99bfe1641102d39f95616ceaab5c3dc960f9'. You are in 'detached HEAD' state. You can look around, make experimental changes and commit them, and y'all tin discard any commits you make in this state without impacting any branches by performing another checkout. If you want to create a new co-operative to retain commits y'all create, yous may exercise so (at present or later on) past using -b with the checkout command over again. Case: git checkout -b <new-branch-name> Head is now at 946b99b... added myname module OK, so there's a LOT of information here that'southward confusing. Permit'due south start by defining some of those terms. Let'south start with Caput.
HEAD is Git's proper noun for any SHA you happen to be looking at at whatsoever fourth dimension. It does NOT mean what is on your filesystem or what is in your staging area. It means what Git thinks you lot have checked out. So, if you lot've edited a file, the version on your filesystem is different than the version in Head (and yeah, Caput is in ALL CAPS).
Next, nosotros have branch. The easiest way to call up about a branch is that it is a characterization on a SHA. Information technology has a few other backdrop that are useful, but for now, recall of a branch as a SHA label.
Annotation: Those of you who have worked with other version control systems (I'thousand looking at y'all, Subversion) volition take a very dissimilar idea of what a branch is. Git treats branches differently, and that is a adept thing.
When we put all this information together, nosotros see that detached HEAD simply means that your Caput is pointing to a SHA that does not have a branch (or label) associated with it. Git very nicely tells yous how to fix that situation. There will be times when you will want to fix it, and in that location volition exist times when you can work in that detached HEAD state just fine.
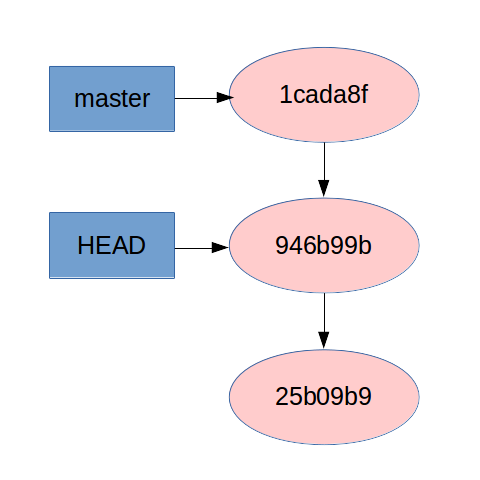
Let'south go back to our demo. If you await at the state of the system now, you can see that the .gitignore file is no longer nowadays. We went back to the state of the arrangement before we made those changes. Below is the diagram of our repo at this state. Note how the Caput and main pointers are pointing at different SHAs:
Alright. Now, how practise we go back to where we were? In that location are 2 means, 1 of which you should know already: git checkout 1cada8f. This will accept you back to the SHA you lot were at when you lot started moving around.
Note: One odd thing, at least in my version of Git, is that information technology still gives you a detached HEAD warning, even though y'all're dorsum to the SHA associated with a branch.
The other fashion of getting back is more common: bank check out the branch yous were on. Git always starts you off with a branch called principal. We'll learn how to make other branches subsequently simply for at present nosotros'll stick with master.
To get back to where you where, you lot can simply exercise git checkout primary. This volition return y'all to the latest SHA committed to the chief co-operative, which in our case has the commit message "created .gitignore". To put it another style, git checkout principal tells Git to make HEAD point to the SHA marked by the characterization, or co-operative, master.
Note that in that location are several methods for specifying a specific commit. The SHA is probably the easiest to understand. The other methods use different symbols and names to specify how to get to a specific commit from a known place, like HEAD. I won't be going into those details in this tutorial, but if you'd similar more than details you can find them here.
Branching Basics
Allow's talk a little more than nearly branches. Branches provide a way for you to keep dissever streams of development apart. While this can be useful when yous're working solitary, it's well-nigh essential when you lot're working on team.
Imagine that I'm working in a small team and have a feature to add together to the project. While I'm working on information technology, I don't want to add together my changes to master as it yet doesn't piece of work correctly and might mess up my team members.
I could just expect to commit the changes until I'yard completely finished, only that'south not very rubber and non always practical. So, instead of working on master, I'll create a new co-operative:
$ git checkout -b my_new_feature Switched to a new branch 'my_new_feature' $ git status On branch my_new_feature nothing to commit, working directory clean We used the -b pick on the checkout command to tell Git we wanted information technology to create a new branch. Equally yous tin run into to a higher place, running git condition in our branch shows usa that the branch name has, indeed, inverse. Let's expect at the log:
$ git log commit 1cada8f59b43254f621d1984a9ffa0f4b1107a3b Author: Jim Anderson <jima@example.com> Date: Thu Mar 8 20:57:42 2022 -0700 created .gitignore commit 946b99bfe1641102d39f95616ceaab5c3dc960f9 Author: Jim Anderson <jima@example.com> Date: Thu Mar eight xx:56:l 2022 -0700 added myname module commit 25b09b9ccfe9110aed2d09444f1b50fa2b4c979c Writer: Jim Anderson <jima@example.com> Appointment: Thu Mar eight xx:53:59 2022 -0700 creating hello.py As I hope you expected, the log looks exactly the same. When you create a new branch, the new branch will offset at the location y'all were at. In this case, nosotros were at the top of master, 1cada8f59b43254f621d1984a9ffa0f4b1107a3b, so that's where the new co-operative starts.
Now, let'due south piece of work on that feature. Make a change to the howdy.py file and commit it. I'll show you the commands for review, but I'll cease showing you lot the output of the commands for things y'all've already seen:
$ git add together hi.py $ git commit -1000 "added code for feature x" At present if yous do git log, you lot'll see that our new commit is present. In my example, it has a SHA 4a4f4492ded256aa7b29bf5176a17f9eda66efbb, but your repo is very likely to have a unlike SHA:
$ git log commit 4a4f4492ded256aa7b29bf5176a17f9eda66efbb Author: Jim Anderson <jima@instance.com> Engagement: Thu Mar eight 21:03:09 2022 -0700 added code for characteristic x commit 1cada8f59b43254f621d1984a9ffa0f4b1107a3b ... the remainder of the output truncated ... Now switch dorsum to the master co-operative and look at the log:
git checkout master git log Is the new commit "added code for feature x" in that location?
Git has a built-in fashion to compare the country of 2 branches then yous don't have to work so hard. Information technology's the show-branch command. Here's what it looks like:
$ git testify-co-operative my_new_feature principal * [my_new_feature] added lawmaking for feature x ! [master] created .gitignore -- * [my_new_feature] added code for feature ten *+ [principal] created .gitignore The nautical chart it generates is a little disruptive at showtime, so allow's walk though it in detail. Showtime off, yous call the command past giving it the name of two branches. In our case that was my_new_feature and master.
The first two lines of the output are the central to decoding the residual of the text. The offset non-space character on each line is either * or ! followed by the name of the co-operative, and then the commit message for the most recent commit on that branch. The * character is used to bespeak that the branch is currently checked-out while the ! is used for all other branches. The character is in the column matching commits in the table below.
The 3rd line is a separator.
Starting on the fourth line, there are commits that are in one co-operative simply not the other. In our current instance, this is pretty easy. There's 1 commit in my_new_feature that'south not in master. Y'all can see that on the fourth line. Notice how that line starts with a * in the offset cavalcade. This is to indicate which co-operative this commit is in.
Finally, the last line of the output shows the kickoff common commit for the ii branches.
This example is pretty easy. To make a ameliorate example, I've made it more interesting past calculation a few more commits to my_new_feature and a few to master. That makes the output await like:
$ git testify-branch my_new_feature master * [my_new_feature] commit iv ! [master] commit 3 -- * [my_new_feature] commit iv * [my_new_feature^] commit 1 * [my_new_feature~2] added code for feature 10 + [master] commit 3 + [main^] commit two *+ [my_new_feature~3] created .gitignore Now you tin can encounter that there are unlike commits in each branch. Note that the [my_new_feature~2] text is i of the commit option methods I mentioned earlier. If you lot'd rather see the SHAs, you can have it bear witness them by adding the –sha1-name pick to the command:
$ git testify-co-operative --sha1-name my_new_feature master * [my_new_feature] commit 4 ! [master] commit 3 -- * [6b6a607] commit 4 * [12795d2] commit ane * [4a4f449] added code for feature x + [de7195a] commit 3 + [580e206] commit 2 *+ [1cada8f] created .gitignore Now y'all've got a branch with a agglomeration of different commits on it. What do y'all practise when you finally finish that feature and are ready to get it to the residual of your team?
There are 3 main ways to get commits from one branch to another: merging, rebasing, and cerise-picking. Nosotros'll cover each of these in plough in the next sections.
Merging
Merging is the simplest of the iii to understand and use. When you lot do a merge, Git volition create a new commit that combines the top SHAs of two branches if it needs to. If all of the commits in the other branch are ahead (based on) the meridian of the current co-operative, information technology will simply practice a fast-foward merge and place those new commits on this branch.
Let'due south support to the bespeak where our show-branch output looked similar this:
$ git show-co-operative --sha1-name my_new_feature main * [my_new_feature] added code for feature x ! [master] created .gitignore -- * [4a4f449] added lawmaking for feature 10 *+ [1cada8f] created .gitignore Now, we want to get that commit 4a4f449 to be on primary. Check out master and run the git merge command there:
$ git checkout principal Switched to branch 'master' $ git merge my_new_feature Updating 1cada8f..4a4f449 Fast-forwards hullo.py | one + 1 file changed, ane insertion(+) Since we were on branch master, we did a merge of the my_new_feature co-operative to us. You tin see that this is a fast forward merge and which files were changed. Let's wait at the log at present:
commit 4a4f4492ded256aa7b29bf5176a17f9eda66efbb Writer: Jim Anderson <jima@example.com> Date: Thu Mar viii 21:03:09 2022 -0700 added code for feature x commit 1cada8f59b43254f621d1984a9ffa0f4b1107a3b Writer: Jim Anderson <jima@example.com> Appointment: Thu Mar 8 20:57:42 2022 -0700 created .gitignore [rest of log truncated] If we had made changes to master earlier we merged, Git would have created a new commit that was the combination of the changes from the two branches.
1 of the things Git is fairly proficient at is understanding the common ancestors of different branches and automatically merging changes together. If the same section of code has been modified in both branches, Git can't effigy out what to practice. When this happens, it stops the merge part style through and gives you instructions for how to set up the consequence. This is chosen a merge conflict.
Rebasing
Rebasing is like to merging merely behaves a little differently. In a merge, if both branches have changes, so a new merge commit is created. In rebasing, Git will take the commits from 1 branch and replay them, one at a fourth dimension, on the peak of the other branch.
I won't do a detailed demo of rebasing here because setting upwardly a demo to show this is a bit tricky in text and because there is an fantabulous spider web page that covers the topic well and that I'll reference at the end of this section.
Cherry-red-Picking
Cherry-red picking is another method for moving commits from one branch to another. Unlike merging and rebasing, with scarlet-picking you specify exactly which commits you mean. The easiest way to exercise this is just specifying a single SHA:
$ git blood-red-option 4a4f4492ded256aa7b29bf5176a17f9eda66efbb This tells Git to take the changes that went into 4a4f449 and employ them to the current co-operative.
This characteristic tin be very handy when you desire a specific alter but not the entire branch that change was made on.
Working with Remote Repos
All of the commands we've discussed up to this point work with only your local repo. They don't do any advice to a server or over the network. It turns out that there are only iv major Git commands which really talk to remote repos:
-
clone -
fetch -
pull -
button
That'due south it. Everything else is washed on your local machine. (OK, to exist completely accurate, there are other commands that talk to remotes, only they don't fall into the basic category.)
Let'south await at each of these commands in plow.
Clone
Git clone is the command y'all use when you take the address of a known repository and you want to brand a local re-create. For this example, allow's use a pocket-sized repo I have on my GitHub account, github-playground.
The GitHub page for that repo lives here. On that page yous will find a "Clone or Download" button which gives you the URI to use with the git clone command. If you copy that, you tin then clone the repo with:
git clone git@github.com:jima80525/github-playground.git Now you have a complete repository of that project on your local motorcar. This includes all of the commits and all of the branches ever fabricated on information technology. (Note: This repo was used by some friends while they were learning Git. I copied or forked information technology from someone else.)
If yous want to play with the other remote commands, y'all should create a new repo on GitHub and follow the same steps. You are welcome to fork the github-playground repo to your account and use that. Forking on GitHub is washed by clicking the "fork" button in the UI.
Fetch
To explicate the fetch command clearly, we need to take a step back and talk about how Git manages the relationship betwixt your local repo and a remote repo. This adjacent part is background, and while it'south non something you'll use on a day-to-day ground, it volition make the difference betwixt fetch and pull make more than sense.
When you lot clone a new repo, Git doesn't just copy down a single version of the files in that projection. It copies the entire repository and uses that to create a new repository on your local car.
Git does not make local branches for you except for chief. However, it does keep track of the branches that were on the server. To do that, Git creates a set of branches that all showtime with remotes/origin/<branch_name>.
Only rarely (almost never), will yous check out these remotes/origin branches, but it's handy to know that they are there. Retrieve that every co-operative that existed on the remote when you cloned the repo will have a co-operative in remotes/origin.
When you create a new branch and the name matches an existing branch on the server, Git volition marker you local branch equally a tracking branch that is associated with a remote branch. Nosotros'll see how that is useful when we get to pull.
Now that you know nigh the remotes/origin branches, understanding git fetch will be pretty piece of cake. All fetch does is update all of the remotes/origin branches. It volition modify only the branches stored in remotes/origin and not whatever of your local branches.
Pull
Git pull is simply the combination of two other commands. Beginning, it does a git fetch to update the remotes/origin branches. Then, if the branch yous are on is tracking a remote branch, then it does a git merge of the respective remote/origin co-operative to your co-operative.
For example, say you were on the my_new_feature co-operative, and your coworker had just added some code to it on the server. If you lot practise a git pull, Git volition update ALL of the remotes/origin branches and then practise a git merge remotes/origin/my_new_feature, which volition get the new commit onto the branch you're on!
In that location are, of course, some limitations here. Git won't let yous even try to do a git pull if you accept modified files on your local system. That can create too much of a mess.
If you take commits on your local branch, and the remote likewise has new commits (ie "the branches take diverged"), then the git merge portion of the pull will create a merge commit, merely as we discussed higher up.
Those of you who take been reading closely will see that you tin can too accept Git do a rebase instead of a merge by doing git pull -r.
Button
As you lot have probably guessed, git push is just the reverse of git pull. Well, virtually the opposite. Push button sends the info almost the co-operative you are pushing and asks the remote if it would like to update its version of that branch to match yours.
Generally, this amounts to you lot pushing your new changes upwardly to the server. At that place are a lot of details and complication here involving exactly what a fast-forwards commit is.
There is a fantastic write-up here. The gist of information technology is that git push makes your new commits bachelor on the remote server.
Putting It All Together: Uncomplicated Git Workflow
At this point, we've reviewed several basic Git commands and how you might employ them. I'll wrap up with a quick description of a possible workflow in Git. This workflow assumes yous are working on your local repo and have a remote repo to which you volition push changes. Information technology can be GitHub, but it volition work the same with other remote repos. It assumes you've already cloned the repo.
-
git status– Make certain your current area is clean. -
git pull– Get the latest version from the remote. This saves merging issues later. - Edit your files and make your changes. Remember to run your linter and practise unit tests!
-
git status– Find all files that are changed. Brand certain to lookout man untracked files as well! -
git add together [files]– Add the changed files to the staging area. -
git commit -grand "message"– Make your new commit. -
git push button origin [branch-proper noun]– Push your changes up to the remote.
This is 1 of the more than basic flows through the system. There are many, many ways to use Git, and you lot've just scratched the surface with this tutorial. If you use Vim or Sublime as your editor, you might want to checkout these tutorials, which will show y'all how to become plugins to integrate Git into your editor:
- VIM and Python – A Match Made in Heaven
- Setting Up Sublime Text three for Full Stack Python Development
- Emacs – The Best Python Editor?
If you'd like to take a deeper dive into Git, I can recommend these books:
- The free, online Pro Git is a very handy reference.
- For those of yous who like to read on newspaper, there's a print version of Pro Git and I found O'Reilly's Version Control with Git to exist useful.
Sentry Now This tutorial has a related video class created by the Real Python team. Watch it together with the written tutorial to deepen your understanding: Introduction to Git and GitHub for Python Developers
Source: https://realpython.com/python-git-github-intro/
0 Response to "can you upload python files to github"
Post a Comment